Swagger UI 与文档发布教程
Swagger UI 与文档发布教程 Swagger UI 是一种基于 OpenAPI 规范(原 Swagger 规范)的 API 文档可视化工具,它能将 API 规范文档转换为交互式 API 文档界面。通过 Swagger UI,开发者和用户可以: 查看 API 的详细信息 直接在界面上测试 API 请求 查看请求和响应示例 了解不同 API 端点的功能和参数 Swagger UI 的优势 ..
教程详情页默认 noindex。
Swagger UI 与文档发布教程
Swagger UI 是一种基于 OpenAPI 规范(原 Swagger 规范)的 API 文档可视化工具,它能将 API 规范文档转换为交互式 API 文档界面。
通过 Swagger UI,开发者和用户可以:
- 查看 API 的详细信息
- 直接在界面上测试 API 请求
- 查看请求和响应示例
- 了解不同 API 端点的功能和参数
Swagger UI 的优势
- 可视化:提供清晰、直观的 API 文档界面
- 交互性:支持在线测试 API,无需额外工具
- 实时更新:代码变更后,文档自动更新
- 标准化:基于 OpenAPI 规范,保持一致性
- 跨语言支持:适用于各种编程语言和框架
集成 Swagger UI
1. 在 Spring Boot 项目中集成
添加依赖
在 pom.xml 添加以下依赖:
实例
<dependency>
<groupId>io.springfox</groupId>
<artifactId>springfox-swagger2</artifactId>
<version>3.0.0</version>
</dependency>
<!-- Springfox Swagger UI -->
<dependency>
<groupId>io.springfox</groupId>
<artifactId>springfox-swagger-ui</artifactId>
<version>3.0.0</version>
</dependency>
或者使用 SpringDoc OpenAPI:
实例
<groupId>org.springdoc</groupId>
<artifactId>springdoc-openapi-ui</artifactId>
<version>1.6.14</version>
</dependency>
配置 Swagger
实例
import org.springframework.context.annotation.Configuration;
import springfox.documentation.builders.ApiInfoBuilder;
import springfox.documentation.builders.PathSelectors;
import springfox.documentation.builders.RequestHandlerSelectors;
import springfox.documentation.service.ApiInfo;
import springfox.documentation.service.Contact;
import springfox.documentation.spi.DocumentationType;
import springfox.documentation.spring.web.plugins.Docket;
import springfox.documentation.swagger2.annotations.EnableSwagger2;
@Configuration
@EnableSwagger2
public class SwaggerConfig {
@Bean
public Docket api() {
return new Docket(DocumentationType.SWAGGER_2)
.select()
.apis(RequestHandlerSelectors.basePackage("com.example.controller"))
.paths(PathSelectors.any())
.build()
.apiInfo(apiInfo());
}
private ApiInfo apiInfo() {
return new ApiInfoBuilder()
.title("API 接口文档")
.description("API 接口详细描述")
.version("1.0.0")
.contact(new Contact("开发团队", "https://example.com", "[email protected]"))
.build();
}
}
对于 SpringDoc OpenAPI:
实例
import org.springframework.context.annotation.Bean;
import org.springframework.context.annotation.Configuration;
import io.swagger.v3.oas.models.OpenAPI;
import io.swagger.v3.oas.models.info.Info;
import io.swagger.v3.oas.models.info.Contact;
@Configuration
public class SwaggerConfig {
@Bean
public OpenAPI customOpenAPI() {
return new OpenAPI()
.info(new Info()
.title("API 接口文档")
.version("1.0.0")
.description("API 接口详细描述")
.contact(new Contact()
.name("开发团队")
.email("[email protected]")
.url("https://example.com")));
}
@Bean
public GroupedOpenApi publicApi() {
return GroupedOpenApi.builder()
.group("public-apis")
.pathsToMatch("/api/**")
.build();
}
}
2. 在 Node.js Express 项目中集成
安装依赖
npm install swagger-jsdoc swagger-ui-express --save
配置 Swagger
实例
const swaggerJsDoc = require('swagger-jsdoc');
const swaggerUi = require('swagger-ui-express');
const app = express();
// Swagger 配置
const swaggerOptions = {
definition: {
openapi: '3.0.0',
info: {
title: 'API 接口文档',
version: '1.0.0',
description: 'API 接口详细描述',
contact: {
name: '开发团队',
email: '[email protected]',
url: 'https://example.com'
}
},
servers: [
{
url: 'http://localhost:3000',
description: '开发服务器'
}
]
},
apis: ['./routes/*.js'] // API 路由文件的路径
};
const swaggerDocs = swaggerJsDoc(swaggerOptions);
app.use('/api-docs', swaggerUi.serve, swaggerUi.setup(swaggerDocs));
// ... 其他路由和中间件
app.listen(3000, () => {
console.log('服务器运行在 http://localhost:3000');
console.log('API 文档可在 http://localhost:3000/api-docs 访问');
});
3. 在 Python FastAPI 项目中使用
FastAPI 默认集成了 Swagger UI:
实例
app = FastAPI(
title="API 接口文档",
description="API 接口详细描述",
version="1.0.0",
contact={
"name": "开发团队",
"email": "[email protected]",
"url": "https://example.com",
},
)
@app.get("/")
async def root():
return {"message": "Hello World"}
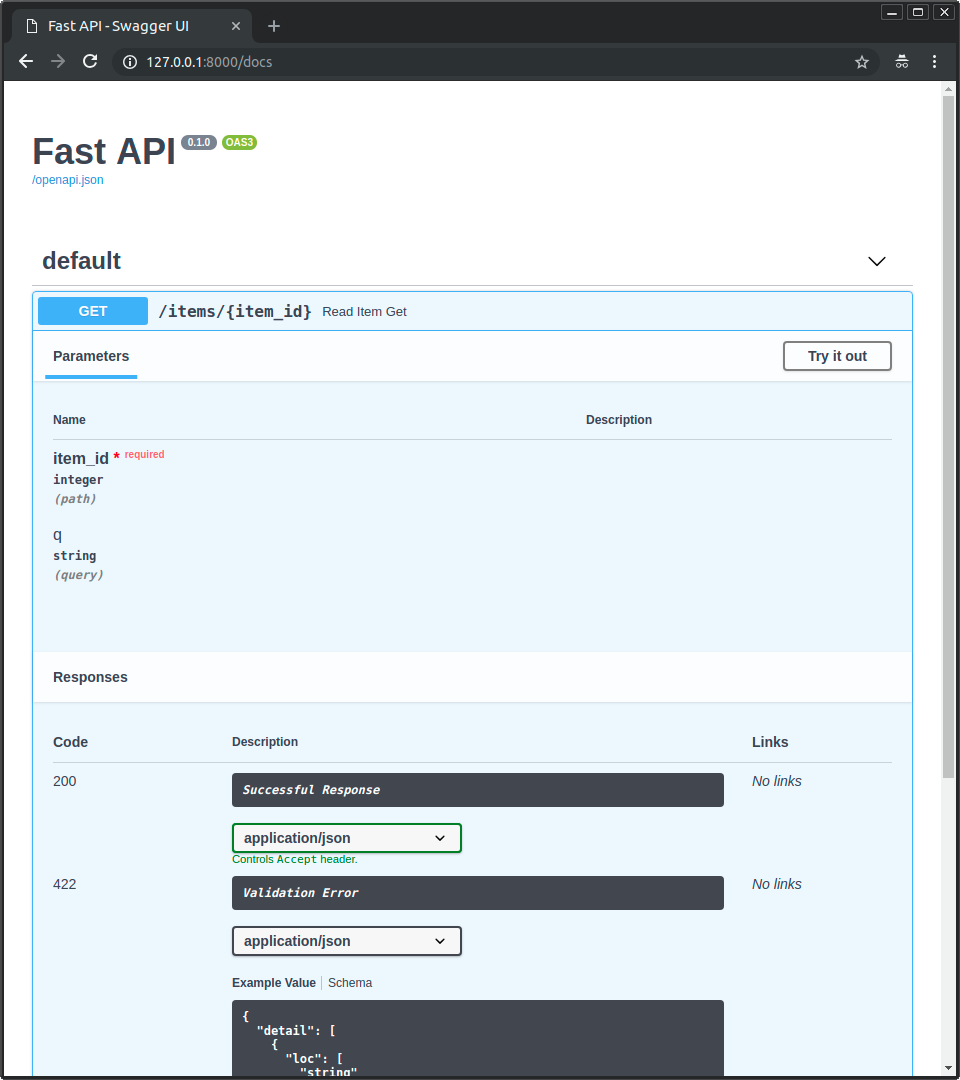
Swagger UI 默认可在 /docs 路径访问,可通过访问 http://localhost:8000/docs 查看文档。
详细内容参见:FastAPI 交互式 API 文档
编写 API 文档
1. Spring Boot 项目中的 API 文档注解
实例
import org.springframework.web.bind.annotation.*;
@RestController
@RequestMapping("/api/users")
@Api(tags = "用户管理")
public class UserController {
@ApiOperation(value = "获取用户列表", notes = "分页获取所有用户信息")
@ApiResponses({
@ApiResponse(code = 200, message = "成功"),
@ApiResponse(code = 400, message = "请求参数错误"),
@ApiResponse(code = 500, message = "服务器内部错误")
})
@GetMapping("/")
public Page<User> getUsers(
@ApiParam(value = "页码", required = true) @RequestParam int page,
@ApiParam(value = "每页记录数", required = true) @RequestParam int size) {
// 业务逻辑
return userService.getUsers(page, size);
}
@ApiOperation(value = "获取单个用户", notes = "根据ID获取用户信息")
@GetMapping("/{id}")
public User getUser(
@ApiParam(value = "用户ID", required = true) @PathVariable Long id) {
// 业务逻辑
return userService.getUser(id);
}
@ApiOperation(value = "创建用户", notes = "创建新用户")
@PostMapping("/")
public User createUser(
@ApiParam(value = "用户信息", required = true) @RequestBody UserDTO userDTO) {
// 业务逻辑
return userService.createUser(userDTO);
}
}
对于 SpringDoc OpenAPI:
实例
import io.swagger.v3.oas.annotations.media.*;
import io.swagger.v3.oas.annotations.responses.*;
import io.swagger.v3.oas.annotations.tags.Tag;
import org.springframework.web.bind.annotation.*;
@RestController
@RequestMapping("/api/users")
@Tag(name = "用户管理", description = "用户相关的API")
public class UserController {
@Operation(
summary = "获取用户列表",
description = "分页获取所有用户信息"
)
@ApiResponses(value = {
@ApiResponse(responseCode = "200", description = "成功"),
@ApiResponse(responseCode = "400", description = "请求参数错误"),
@ApiResponse(responseCode = "500", description = "服务器内部错误")
})
@GetMapping("/")
public Page<User> getUsers(
@Parameter(description = "页码", required = true) @RequestParam int page,
@Parameter(description = "每页记录数", required = true) @RequestParam int size) {
// 业务逻辑
return userService.getUsers(page, size);
}
}
2. Node.js Express 项目中的 API 文档注释
实例
* @swagger
* /api/users:
* get:
* summary: 获取用户列表
* description: 分页获取所有用户信息
* tags: [用户管理]
* parameters:
* - in: query
* name: page
* schema:
* type: integer
* required: true
* description: 页码
* - in: query
* name: size
* schema:
* type: integer
* required: true
* description: 每页记录数
* responses:
* 200:
* description: 成功
* content:
* application/json:
* schema:
* type: object
* properties:
* data:
* type: array
* items:
* $ref: '#/components/schemas/User'
* total:
* type: integer
* 400:
* description: 请求参数错误
* 500:
* description: 服务器内部错误
*/
router.get('/users', (req, res) => {
// 业务逻辑
});
/**
* @swagger
* components:
* schemas:
* User:
* type: object
* required:
* - name
* properties:
* id:
* type: integer
* description: 用户ID
* name:
* type: string
* description: 用户名
* email:
* type: string
* format: email
* description: 用户邮箱
*/
3. Python FastAPI 项目中的 API 文档
实例
from pydantic import BaseModel
from typing import List, Optional
app = FastAPI(title="用户管理API")
class User(BaseModel):
id: int
name: str
email: str
class Config:
schema_extra = {
"example": {
"id": 1,
"name": "张三",
"email": "[email protected]"
}
}
@app.get(
"/api/users/",
summary="获取用户列表",
description="分页获取所有用户信息",
response_model=List[User],
tags=["用户管理"]
)
async def get_users(
page: int = Query(..., description="页码", ge=1),
size: int = Query(..., description="每页记录数", ge=1, le=100)
):
# 业务逻辑
return [
{"id": 1, "name": "张三", "email": "[email protected]"},
{"id": 2, "name": "李四", "email": "[email protected]"}
]
@app.get(
"/api/users/{user_id}",
summary="获取单个用户",
description="根据ID获取用户信息",
response_model=User,
tags=["用户管理"]
)
async def get_user(
user_id: int = Path(..., description="用户ID", ge=1)
):
# 业务逻辑
return {"id": user_id, "name": "张三", "email": "[email protected]"}
自定义 Swagger UI
1. Spring Boot 自定义配置
实例
public Docket api() {
return new Docket(DocumentationType.SWAGGER_2)
.select()
.apis(RequestHandlerSelectors.basePackage("com.example.controller"))
.paths(PathSelectors.regex("/api/.*"))
.build()
.apiInfo(apiInfo())
.useDefaultResponseMessages(false) // 禁用默认响应消息
.globalResponseMessage(RequestMethod.GET, globalResponses()) // 自定义全局响应消息
.securitySchemes(Arrays.asList(apiKey())) // 配置安全认证
.securityContexts(Arrays.asList(securityContext())); // 配置安全上下文
}
private List<ResponseMessage> globalResponses() {
return Arrays.asList(
new ResponseMessageBuilder().code(200).message("成功").build(),
new ResponseMessageBuilder().code(400).message("请求参数错误").build(),
new ResponseMessageBuilder().code(401).message("未授权").build(),
new ResponseMessageBuilder().code(403).message("禁止访问").build(),
new ResponseMessageBuilder().code(500).message("服务器内部错误").build()
);
}
private ApiKey apiKey() {
return new ApiKey("JWT", "Authorization", "header");
}
private SecurityContext securityContext() {
return SecurityContext.builder()
.securityReferences(defaultAuth())
.forPaths(PathSelectors.regex("/api/.*"))
.build();
}
private List<SecurityReference> defaultAuth() {
AuthorizationScope authorizationScope = new AuthorizationScope("global", "accessEverything");
AuthorizationScope[] authorizationScopes = new AuthorizationScope[1];
authorizationScopes[0] = authorizationScope;
return Arrays.asList(new SecurityReference("JWT", authorizationScopes));
}
2. Express 自定义配置
实例
customCss: '.swagger-ui .topbar { display: none }', // 自定义CSS
customSiteTitle: "API 文档中心", // 页面标题
customfavIcon: "/favicon.png", // 自定义图标
swaggerOptions: {
persistAuthorization: true, // 保留授权信息
docExpansion: 'none', // 默认折叠所有接口
tagsSorter: 'alpha', // 标签按字母排序
operationsSorter: 'alpha', // 操作按字母排序
defaultModelsExpandDepth: -1, // 隐藏模型
filter: true, // 启用过滤
}
};
app.use('/api-docs', swaggerUi.serve, swaggerUi.setup(swaggerDocs, options));
3. FastAPI 自定义配置
实例
from fastapi.openapi.docs import get_swagger_ui_html
from fastapi.staticfiles import StaticFiles
app = FastAPI(
title="API 接口文档",
docs_url=None, # 禁用默认的 Swagger UI
)
app.mount("/static", StaticFiles(directory="static"), name="static")
@app.get("/docs", include_in_schema=False)
async def custom_swagger_ui_html():
return get_swagger_ui_html(
openapi_url=app.openapi_url,
title=app.title + " - API 文档",
oauth2_redirect_url=app.swagger_ui_oauth2_redirect_url,
swagger_js_url="/static/swagger-ui-bundle.js",
swagger_css_url="/static/swagger-ui.css",
swagger_favicon_url="/static/favicon.png",
swagger_ui_parameters={
"docExpansion": "none",
"defaultModelsExpandDepth": -1,
"filter": True,
}
)
文档发布
1. 内部发布
对于团队内部使用,可以直接通过应用程序内部的 Swagger UI 访问:
- Spring Boot:
http://your-app-host:port/swagger-ui/index.html - Express:
http://your-app-host:port/api-docs - FastAPI:
http://your-app-host:port/docs
2. 静态文档生成
使用 Swagger Codegen 生成静态文档
# 安装 Swagger Codegen CLI
wget https://repo1.maven.org/maven2/io/swagger/codegen/v3/swagger-codegen-cli/3.0.35/swagger-codegen-cli-3.0.35.jar -O swagger-codegen-cli.jar

# 生成静态 HTML 文档
java -jar swagger-codegen-cli.jar generate -i http://your-app-host:port/v3/api-docs -l html2 -o ./api-docs
使用 Redoc 生成静态文档
# 安装 redoc-cli
npm install -g redoc-cli

# 生成静态 HTML 文档
redoc-cli bundle http://your-app-host:port/v3/api-docs -o ./api-docs/index.html
3. 整合到 CI/CD 流程
在 CI/CD 管道中添加文档生成和发布步骤:
Jenkins 流水线示例
实例
agent any
stages {
// ... 其他构建和测试阶段
stage('Generate API Documentation') {
steps {
sh 'java -jar swagger-codegen-cli.jar generate -i http://your-app-host:port/v3/api-docs -l html2 -o ./api-docs'
}
}
stage('Publish Documentation') {
steps {
// 发布到 Nginx 静态文件服务器
sh 'rsync -avz --delete ./api-docs/ user@doc-server:/var/www/api-docs/'
// 或发布到对象存储(如 AWS S3)
sh 'aws s3 sync ./api-docs/ s3://your-bucket/api-docs/ --delete'
}
}
}
}
GitHub Actions 工作流示例
实例
on:
push:
branches: [ main ]
jobs:
build-and-deploy:
runs-on: ubuntu-latest
steps:
- uses: actions/checkout@v2
- name: Set up JDK
uses: actions/setup-java@v2
with:
distribution: 'adopt'
java-version: '11'
- name: Build application
run: ./mvnw clean package
- name: Start application
run: |
java -jar target/your-app.jar &
sleep 30 # 等待应用启动
- name: Generate API Documentation
run: |
wget -q https://repo1.maven.org/maven2/io/swagger/codegen/v3/swagger-codegen-cli/3.0.35/swagger-codegen-cli-3.0.35.jar -O swagger-codegen-cli.jar
java -jar swagger-codegen-cli.jar generate -i http://localhost:8080/v3/api-docs -l html2 -o ./api-docs
- name: Deploy to GitHub Pages
uses: JamesIves/github-pages-deploy-action@4.1.5
with:
branch: gh-pages
folder: api-docs
4. 使用 API 文档管理平台
除了自行部署,还可以使用专业的 API 文档管理平台:
- Swagger Hub: 提供 API 设计和文档托管服务
- Postman: 不仅可以测试 API,还可以发布 API 文档
- ReadMe.io: 提供全面的 API 文档管理和开发者门户
- Stoplight: 提供 API 设计、文档和治理工具
5. Docker 部署 Swagger UI
实例
# 设置环境变量
ENV SWAGGER_JSON=/swagger/openapi.json
ENV BASE_URL=/api-docs
# 复制 OpenAPI 规范文件
COPY openapi.json /swagger/
# 暴露端口
EXPOSE 8080
# 启动 Swagger UI
CMD ["sh", "/usr/share/nginx/docker-run.sh"]
构建和运行:
docker build -t my-swagger-ui .
docker run -p 8080:8080 my-swagger-ui
访问: http://localhost:8080/api-docs
最佳实践
1. 文档规范
- 保持简洁明了: 描述应简洁而有针对性
- 分组管理: 使用标签对 API 进行逻辑分组
- 提供示例: 为请求和响应提供示例
- 标准化错误处理: 统一错误响应格式和状态码
- 版本控制: 在文档中明确 API 版本信息
2. 安全配置
- 敏感信息处理: 不在文档中暴露敏感信息
- 生产环境配置: 在生产环境中可选择性禁用或限制文档访问
- 认证机制: 配置文档访问认证
实例
@Bean
public Docket api() {
return new Docket(DocumentationType.SWAGGER_2)
.enable(!environment.acceptsProfiles(Profiles.of("prod")))
// ... 其他配置
}
3. 自动化测试
结合文档和测试,确保文档内容与实际 API 行为保持一致:
实例
@Test
public void validateSwaggerDocumentation() {
// 获取 Swagger JSON
String swaggerJson = given()
.when()
.get("/v3/api-docs")
.then()
.statusCode(200)
.extract().asString();
// 验证 Swagger 文档
OpenAPI openAPI = new OpenAPIParser().readContents(swaggerJson, null, null).getOpenAPI();
assertNotNull(openAPI);
// 验证特定端点是否在文档中
assertNotNull(openAPI.getPaths().get("/api/users"));
}
常见问题解决
1. Swagger UI 不显示或加载错误
- 检查依赖版本: 确保依赖版本兼容
- 检查配置类: 确保配置类正确注册
- 检查路径映射: 确保路径映射正确
- 检查跨域设置: 如果跨域访问,确保 CORS 配置正确
2. 接口信息不完整
- 检查注解: 确保所有必要注解都已添加
- 检查包扫描路径: 确保扫描路径包含所有控制器
- 检查模型类: 确保模型类有正确的描述
3. 生产环境安全问题
配置生产环境禁用或保护文档:
# application-prod.properties
springdoc.swagger-ui.enabled=false
springdoc.api-docs.enabled=false
或使用基本认证保护:
实例
@Profile("prod")
public class SwaggerSecurityConfig extends WebSecurityConfigurerAdapter {
@Override
protected void configure(HttpSecurity http) throws Exception {
http.requestMatchers()
.antMatchers("/swagger-ui/**", "/v3/api-docs/**")
.and()
.authorizeRequests()
.anyRequest().hasRole("ADMIN")
.and()
.httpBasic();
}
}
总结
Swagger UI 是一个强大的 API 文档工具,通过正确配置和使用,可以大大提高 API 的可用性和开发效率。本教程介绍了 Swagger UI 的基本概念、集成方法、文档编写、自定义配置、文档发布以及最佳实践,希望对您的 API 文档工作有所帮助。
记住以下关键点:
- 选择适合项目技术栈的 Swagger 集成方式
- 精心设计和编写 API 文档注解或注释
- 根据需要自定义 Swagger UI 界面
- 选择合适的文档发布方式
- 遵循最佳实践,确保文档的准确性和安全性
通过合理使用 Swagger UI,您可以为您的 API 提供专业、交互式的文档,让您的 API 更易于理解和使用。